
I’m really convinced that you want to learn how to start a money-making blog in Kenya, right? No doubt!
The experience I have gathered over the years will be shared for free.
My first blog failed. But I didn’t despair. Six months later, I put myself together and launched another blog.
Guess what?
My second blog succeeded. I managed to grow the blog to thousands of monthly pageviews.
And I realized my dream of making money online.
No wonder I prepared this guide on how to start a successful blog in Kenya.
This guide is designed to equip you with skills to help you start a money-making blog.
I want you to succeed on your first attempt.
Well, let’s get started now!
How To Start a Blog In Kenya In 8 Simple Steps
1. Choose a Niche
This is the foundation. We should yearn to build a very strong foundation.
So what is a niche?
A niche is a specific topic or subject area that you will be writing about on your blog. You should picky here.
You should choose a niche that you’re interested in writing about.
Don’t write about anything! Have a specific topic.
If you write anything, you will have no audience.
1. Choose a topic.
I want you to choose a topic that you enjoy discussing. I believe it will be much easier to come up with content ideas and stay motivated.
2. Choose a topic that you’re knowledgeable about.
I recommend you choose a topic that you are knowledgeable about to help you build trust and attract a loyal audience.
3. Choose a topic that has a large potential audience.
You will be able to attract more readers and build a successful blog.
4. Choose a topic that you can monetize.
The common ones are ads, affiliate marketing, and sponsorships.
Read also: Best affiliate programs in Kenya
2. Choose a Domain Name And Web Hosting
Domain name
This is the web address that people will use to find your site. For example, Visionarybloger.com.
Points to consider:
1. Easy to remember
2. Accurately represent your business
3. Should be available
4. Should be affordable
Also, think about what domain name extensions are available.
Once you’ve chosen a domain name, you need to register it with a domain name registrar.
I recommend Namecheap to my readers.
Purchase your domain name from Namecheap.
Why Namecheap?
1. Price
Namecheap offers some of the most competitive domain name prices on the market.
2. Customer Service
Namecheap has excellent customer service.
3. Ease of Use
Namecheap is a very easy site to use. It is simple to purchase a domain name and set up hosting with them.
Read also: How to make money with affiliate marketing
Domain registration process
1. Go to Namecheap.com. Scroll to Domains at the top of the page and select Marketplace

2. Click on the Buy Now tab.

3. Add it to your Cart.

4. Then “Checkout”.

Kudos! You have successfully bought a domain name at Namecheap.
Web hosting
This is another aspect where you should not go wrong. So you should choose your web hosting carefully.
But no pressure!
Points to consider:
- Price
Web hosting can be expensive, but there are numerous affordable options out there.
2. Uptime
Find a host that has excellent uptime. Not all servers are always offline.
3. Bandwidth
The web hosting company you choose should have enough bandwidth to support your website’s traffic.
4. Ease of use
This is also extremely important. Find a web hosting that has a user-friendly interface.
Some of the best web hosting companies for beginners are Cloudways, Rocket.net, and Namecheap.

$1.98/month
Hosting ordering process
1 . Visit the NameCheap homepage and click on the Hosting tab.

2. Select the package you need, the billing cycle (monthly or yearly), and the data center location – US, UK, or EU, and click Get Started.

3. After selecting, you will be redirected to the Domain Name Connection step.

You can connect an already existing domain or register a brand new domain.
4. Click Connect To Hosting to continue.

If you add one or more domains to the Shopping Cart but you want to use one of them as the main domain for their hosting, you can use the Already in Cart option.
5. Pick a domain name.

6. Once the domain and hosting are added, Then purchase by clicking on the Add to Cart button:

7. Next, Review your order details. Then click on Confirm Order to go to the checkout.

8. Select the payment method. Choose one. The options are Credit Card, Paypal, or Account Funds.

9. Agree to their Terms and Agreements. When set, click on Pay Now.
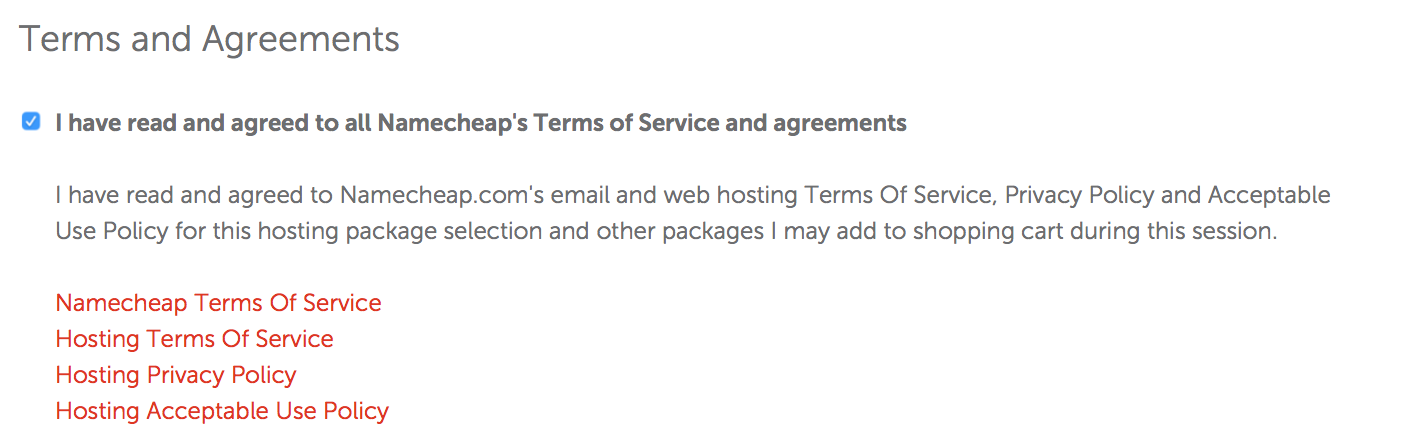
For beginners, I recommend you buy shared hosting which is normally activated instantly.
When your account is activated, you will receive your Hosting Welcome Email with all your account’s login details, settings, and instructions. to help you get started.
3. Install WordPress
WordPress is the best blogging platform on this planet.
A blog platform is a software or web application that enables users to create and manage their own blogs.
It is the most popular blogging system in use on the web today.
How to install WordPress automatically
Follow the instructions to install WordPress using Softaculous.
Use the Softaculous automatic app installer to install WordPress faster. To use Softaculous, log in to your host’s cPanel account and locate the Softaculous or WordPress installer icon in the Auto Installers section.

- Log into your account – cPanel.
- Choose the Softaculous Apps Installer icon.
- Click the WordPress logo.
- Click the Install tab to proceed.
- Supply the following information:
- Choose the domain – enter the domain you wish to install WordPress on.
- Indicate the root folder for installation. The Directory field is empty by default.
- Database Name – No need to change it.
- Once you finish, click Install.
Softaculous will run the installer with the settings you supplied and deliver a success message once the process is complete. You will2 links. One to your site and another link to your WordPress admin area.
4. Install a theme
A blog theme is a set of design and layout settings that control the appearance of a blog’s content.
It can include colors, fonts, and the placement of elements on a page.
Most blog platforms have themes that users can install, or users can create their own themes.
To install a blog theme, users first need to find a theme that they like.
How to Install a Theme via WordPress dashboard
The easiest method I use to install themes is via the WordPress dashboard.
Log into it via http://yourdomain.com/wp-admin/.
1. Goto the Appearance menu on the left side >> Themes.

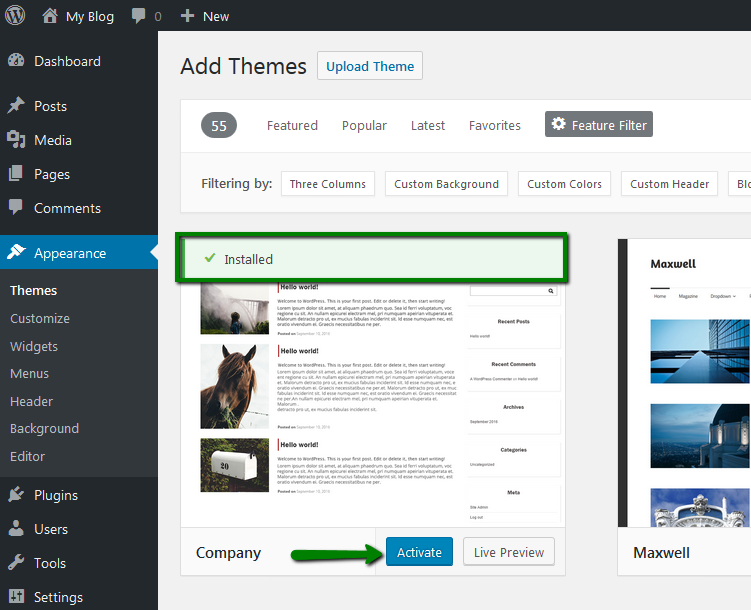
2. You can manage installed themes or install a new one. If you want to install a theme, simply click Add New button.

3. A list of the themes available for installation will be displayed.

4. You can set your search parameters by checking the necessary parameters. These are Layout (1), Features (2), and Subject (3). Once selected, click on Apply Filters.

5. Once the list of the themes you searched for is displayed. To set up a theme, click on the Install button.

6. Once the setup is complete, activate the theme by clicking Activate.
7. Customize it.

5. Install plugins
Install must-have plugins such as Yoast for SEO.
Take the following steps to install plugins in WordPress:
How to Install a plugin Automatically
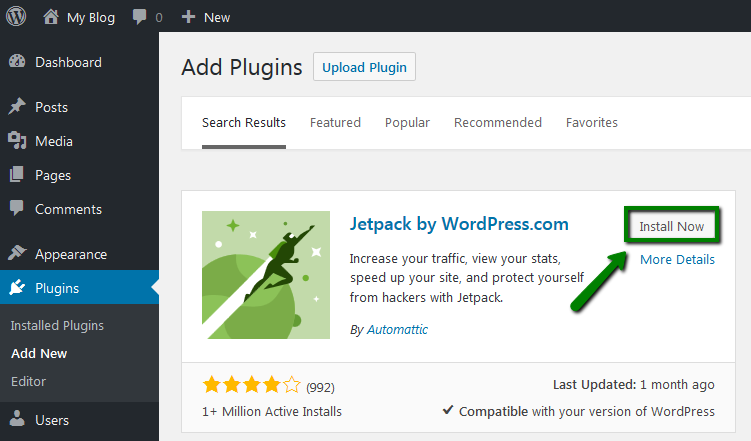
1. Log in to WordPress Admin Dashboard and go to the Plugins menu on the left >> Add new.

2. Search for the plugin in the search bar.

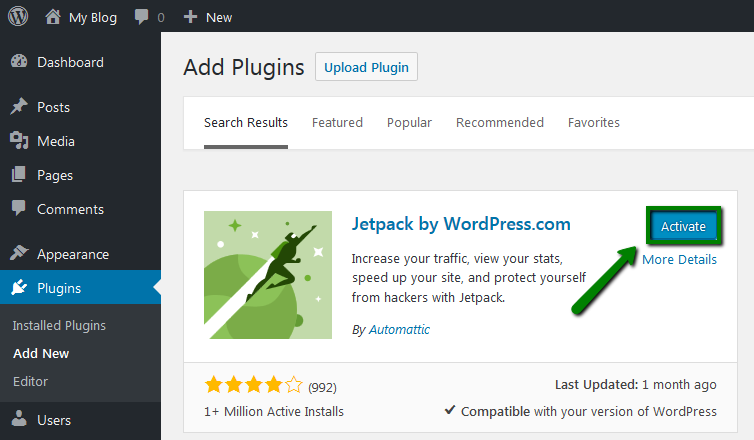
3. A list of the plugins available will be displayed. Then click Install Now to install the plugin.
4. A notification that the plugin has been installed will be seen, click Activate to continue.
6. Write Your First Post
Most importantly to make money online.
But, if you’ve never written a blog post before, it can be a little daunting.
To write a blog post:
- Log in to your WordPress Admin Dashboard.
- In the admin dashboard, click the ‘Posts’ tab.
- Click the ‘Add New’ sub-tab.
- Write: your post title in the upper field, and enter your post body content in the main post editing box below it.
- Select a category, and make other selections from the sections as you wish.
- When you are ready, click Publish.

7. Promote Your Blog
With the tips below, you can promote your blog and find new readers.
1. Research your audience. Know your target audience.
2. Create high-quality content. High-quality content creates loyal readers.
3. Social media. Market your content on social media.
4. Use SEO to improve your blog’s visibility. Use keywords and other SEO techniques to make your blog easier to find online.
5. Use paid advertising. Paid advertising yields results faster.
6. Get involved in the blogging community. Join blogging communities and forums, and connect with other bloggers.
7. Attend blogging events. Attend blogging events and meet other bloggers in person.
8. Use guest bloggers. Invite guest bloggers to write for your blog.
9. Create eBooks and other content. eBooks attract more readers.
8. Monetize Your Blog
Blogging can be a great way to make money.
Here are five effective ways to monetize your blog:
1. Use Google Adsense
Google Adsense is a program that pays you money for displaying ads on your blog.
2. Sell advertising space.
Advertisers will pay you to place their ads on your blog, and in return, you’ll earn a commission on any sales that result from those ads.
3. Offer paid subscriptions.
Another way to make money from your blog is to offer paid subscriptions.
This involves setting up a membership area on your blog where readers can pay to access exclusive content or services.
4. Sell digital products.
This could include things like e-books, online courses, or digital templates.
5. Promote affiliate products.
Basically, you promote other people’s products and services in exchange for a commission on any sales that result.
Globally, there are over 600 million blogs. The number of blogs increases virtually every day.
Do you know that you should also start a blog in Kenya?
I’ll talk about 7 reasons why you should start a blog in Kenya.
Why You Should Start a Blog In Kenya
1. Start a Blog To Make Money Online In Kenya

Most people have turned their hobbies into online businesses. Blogging is their side hustle or full-time job.
They make a living out of a blog. You can start a blog in Kenya and earn a living from it. Blogging is a lucrative business.
Therefore, create a blog and start selling something that you are good at and monetize your blog.
2. Create a Blog To save the Lives Of Kenyans

Most citizens in developing countries don’t have access to quality healthcare services. Because it is not available or it is expensive. So they can’t afford it.
However, some people have been able to access information related to health online from bloggers who are trained as health practitioners.
Sometimes, these bloggers write prescriptions for certain medications.
Thus it cuts down on the costs of constitutions. They spend their little money on purchasing drugs.
Skipping consultations helps them to afford and access health care services.
So if you are trained medical personnel, create a blog and help people who can’t access quality health services in Kenya.
3. Start a Blog To convert the people Of Kenya

There are so many blogs that write about religion. These blogs have changed people’s lives and character in Kenya. People who were not believers have come to know God.
The messages shared on the blogs have brought salvation to people. Hence, start a blog in Kenya to help people learn about Christ Jesus.
4. Start Blogging To Entertain People

The internet resonates with entertainment. Today, there are so many blogs that are offering entertainment. This entertainment ranges from audio to video.
Some blogs just upload video songs to entertain the masses. While others upload audio songs. Upload your thrilling songs on a blog just to entertain others.
I hope you know the scientific benefits of laughing! They are huge.
5. Start Your Blog To Become Famous In Kenya

Blogging is a great way you can expose yourself. Blogging will help you interact with different people from all walks of life. You will not only be read by people within your country but also from other countries.
So this interaction will expose you to the rest of the world. Do you want to become famous? Create a blog if you want to become famous.
6. Start Blogging To Enlighten People The People of Kenya

Information about businesses was difficult to come by two decades ago.
Simply search for the information you are looking for concerning businesses and you will access it right away.
People need to be enlightened to get from the shackles of poverty.
7. To Educate Others

It is the greatest equalizer. So it is extremely expensive to acquire.
But most of the educational information can be accessed freely on blogs.
Students taking literature in English, for example, access expensive literature books without being charged a cent. Students can access free educational information from blogs.